Embed and widget
Written By Stanislas
Last updated 6 months ago
Embed your AI agent directly on external websites with a customizable chat widget. Give your customers, visitors, or users instant access to your agent without requiring a Swiftask account—all through a simple code snippet.
The widget feature lets you deploy your agent as a live chat interface on any website, turning your specialized AI assistant into a customer-facing tool for support, lead generation, or automated assistance.
Overview
The widget feature transforms your Swiftask agent into an embeddable chat interface that appears on external websites. Visitors can interact with your agent through a floating chat bubble that opens into a full conversation window.
You control every aspect of the widget's appearance and behavior—from colors and icons to welcome messages and rate limits. The widget integrates seamlessly with your website and maintains your agent's full capabilities, including knowledge base access and configured skills.
Prerequisites
To embed an agent as a widget, you need:
A Swiftask account (sign up at swiftask.ai)
An existing agent with configured objectives and instructions
Permission to create or edit agents in your workspace
Access to the website where you want to embed the widget (ability to add HTML/JavaScript code)
Step-by-step guide
1. Open your agent for editing
Navigate to the Agents section in the left sidebar to access your agent library.
Find the agent you want to add a widget to and click the pen icon (edit) on the agent card.
2. Navigate to the widget section
In the agent configuration page, look at the left sidebar and click Widget under "More options."
The widget configuration page opens, showing customization options on the left and a live preview of your widget on the right.
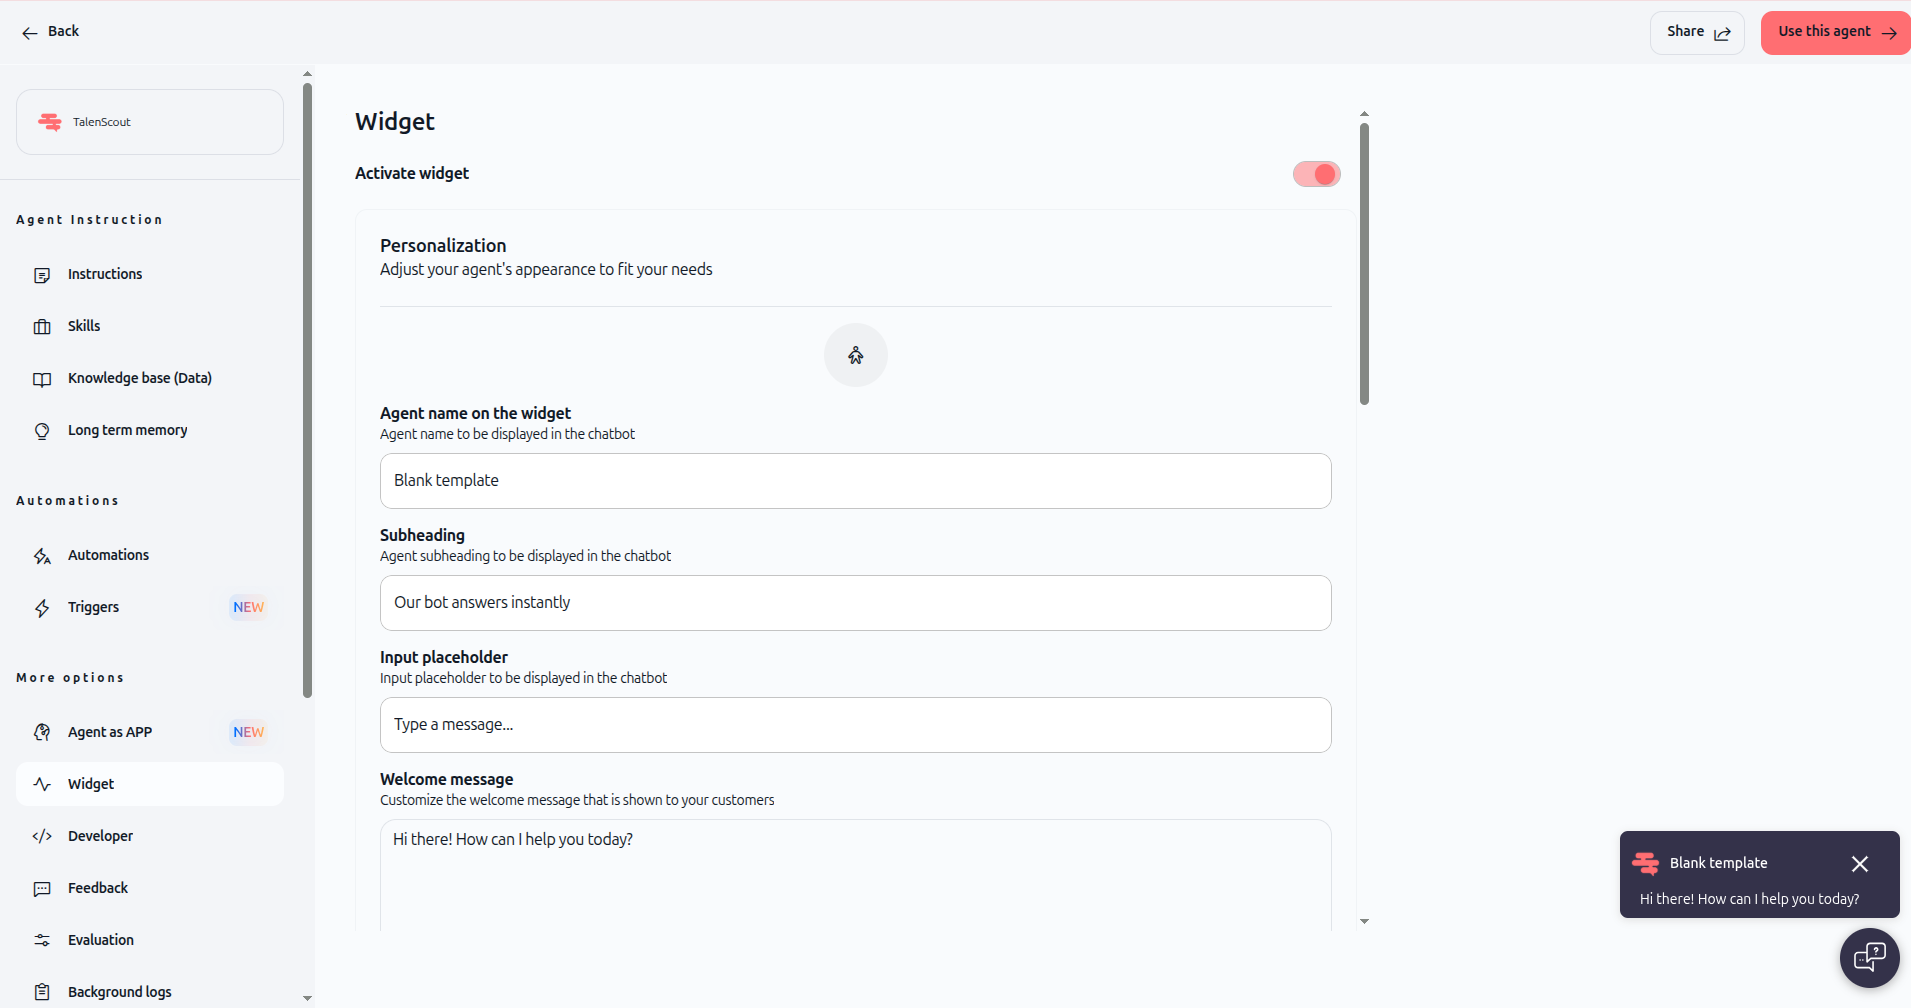
3. Activate the widget
Toggle Activate widget to ON at the top of the configuration page.
Once activated, your widget becomes available for embedding. You can deactivate it at any time to disable external access.
4. Personalize the widget appearance
Configure how your widget looks and behaves:
Agent name on the widget
Enter the name displayed in the chat header. This is the name visitors see when they open the widget.
Subheading
Add a short description that appears below the agent name (e.g., "Our bot answers instantly").
Input placeholder
Customize the placeholder text in the message input field (e.g., "Type a message...").
Welcome message
Write the first message visitors see when they open the widget. This sets the tone and explains what your agent can help with (e.g., "Hi there! How can I help you today?").
Accent color
Select a color that matches your brand. This color appears in the widget header, buttons, and interactive elements. Choose from preset colors or use a custom color picker.
Widget icon
Choose an icon that represents your agent. Select from available robot avatars or upload a custom icon.
Widget position
Choose where the widget appears on your website:
Left – Widget bubble appears in the bottom-left corner
Right – Widget bubble appears in the bottom-right corner
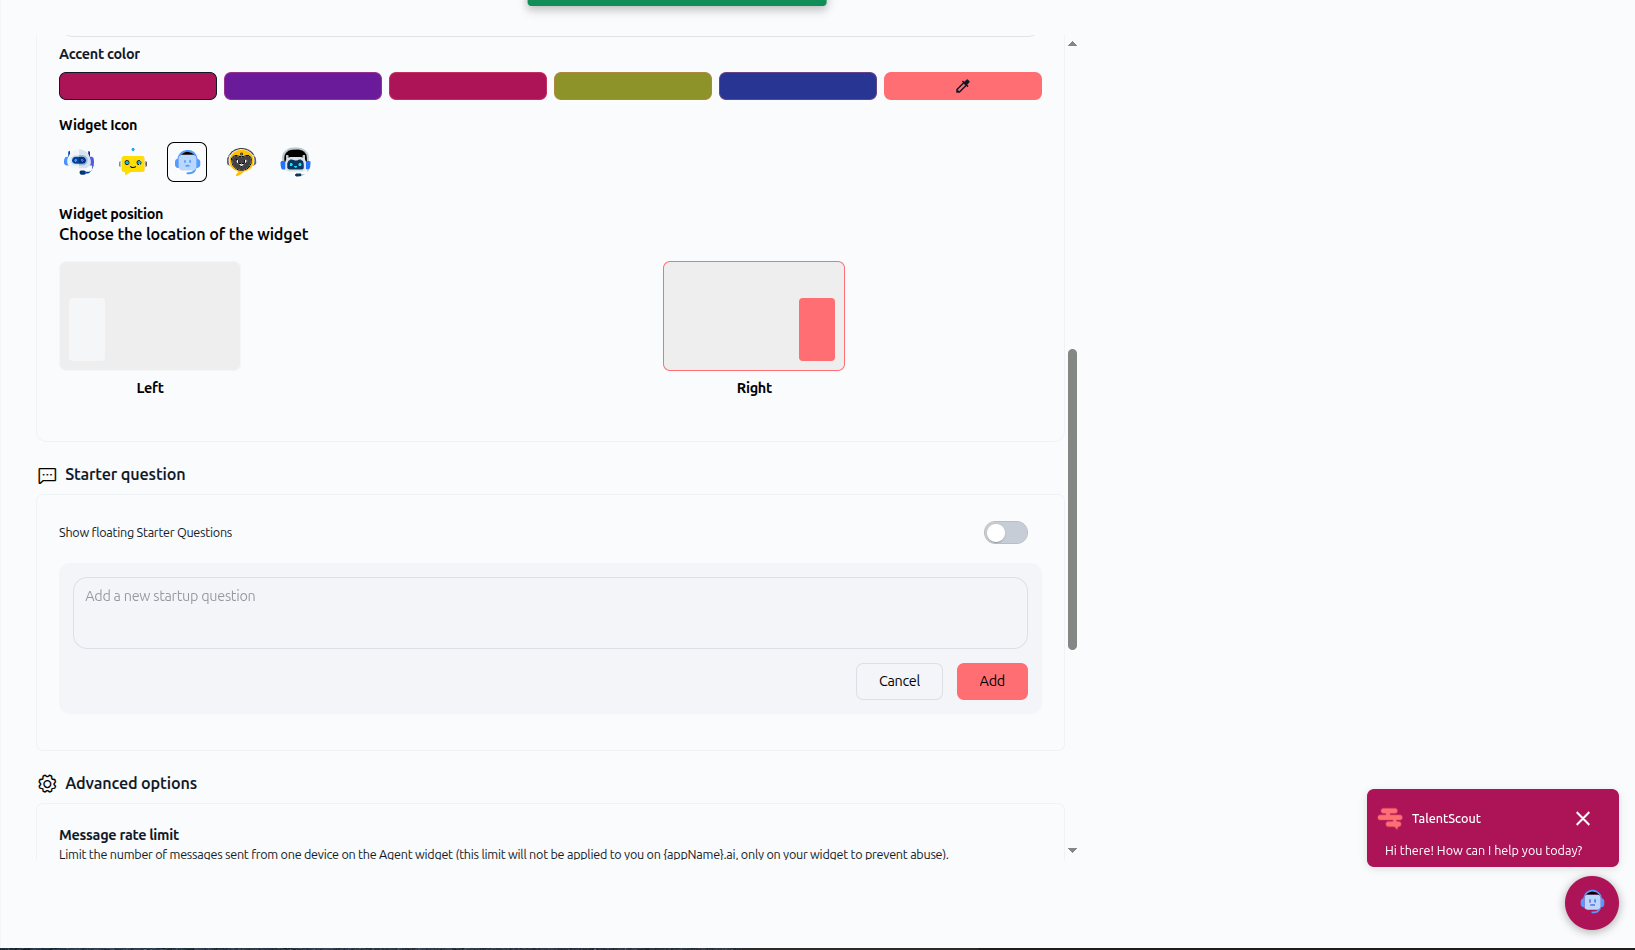
5. Configure starter questions (optional)
Enable Show floating starter questions to display suggested prompts when visitors first open the widget.
Click Add a new startup question to create pre-written questions visitors can click to start a conversation instantly. This helps guide users and reduces friction.
6. Configure advanced options
Expand Advanced options to access additional settings:
Message rate limit
Limit the number of messages sent from one device on the agent widget. Set:
Limit to: Number of messages allowed
Messages every: Time window in seconds
This prevents abuse and controls costs. The limit applies only to your widget, not to your internal Swiftask usage.
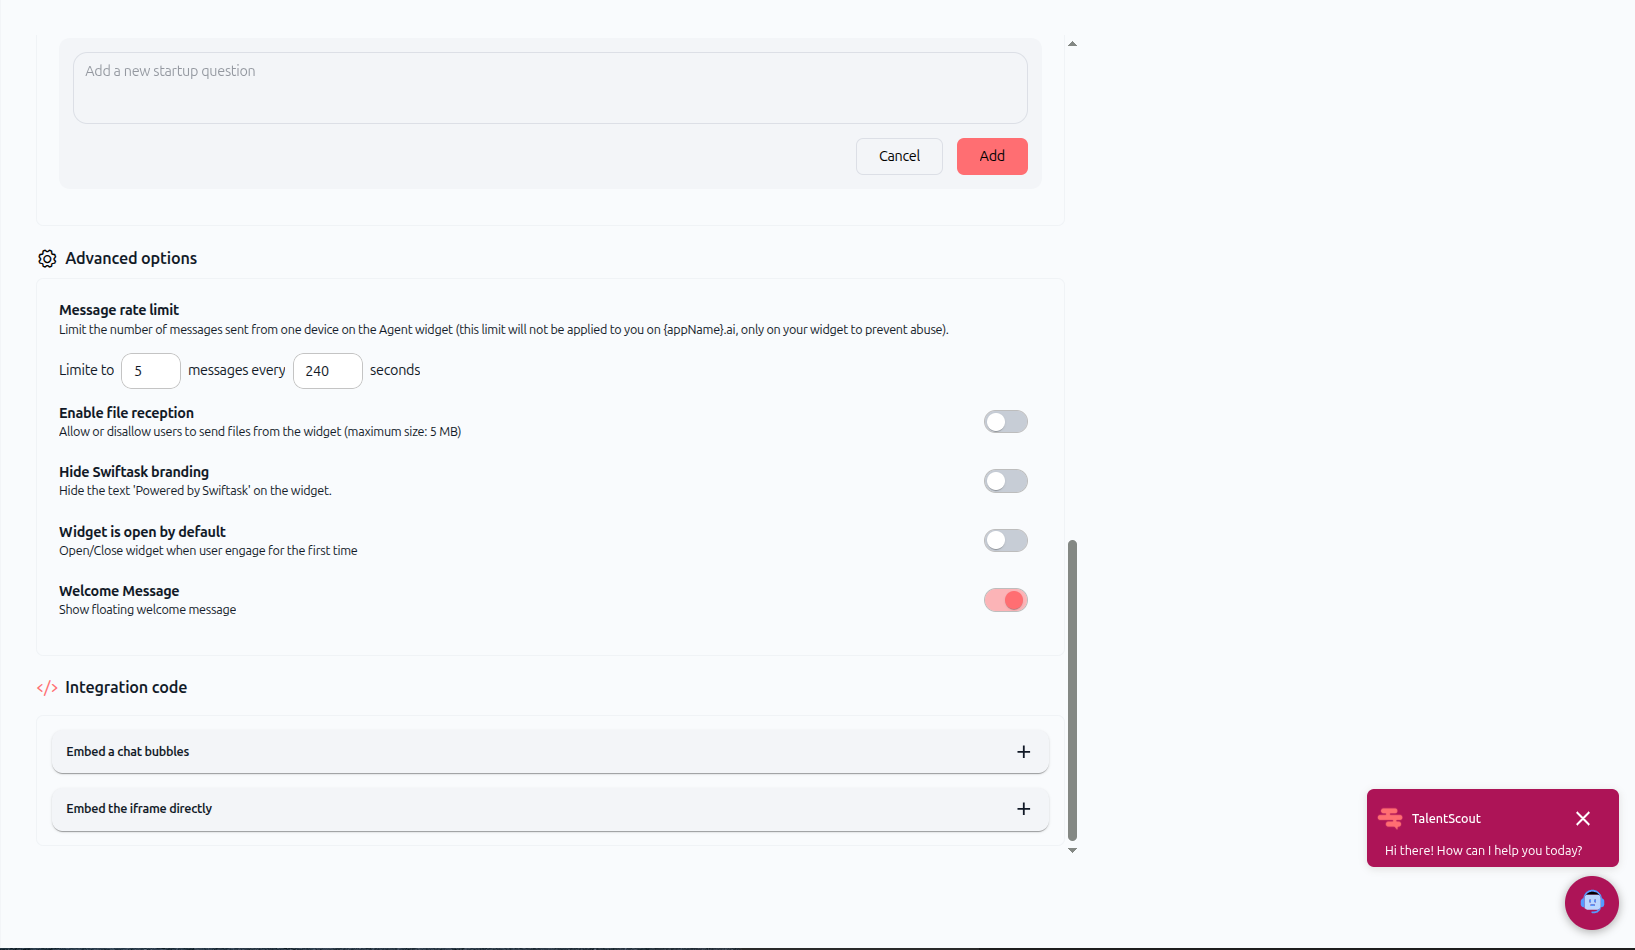
Enable file reception
Toggle ON to allow users to send files from the widget (maximum size: 5 MB). Toggle OFF to disable file uploads.
Hide Swiftask branding
Toggle ON to remove the "Powered by Swiftask" text from the widget footer. This creates a fully white-labeled experience.
Widget is open by default
Toggle ON to automatically open the widget when visitors land on your page. Toggle OFF to keep it collapsed until clicked.
Welcome message
Toggle ON to show a floating welcome message bubble next to the widget icon before visitors open it.
7. Get the integration code
Scroll down to the Integration code section. You'll see two embedding options:
Embed a chat bubbles
Click the + icon to expand this section and copy the code snippet. This embeds a floating chat bubble that visitors can click to open the full widget.
Paste this code before the closing </body> tag in your website's HTML.
Embed the iframe directly
Click the + icon to expand this section and copy the iframe code. This embeds the chat interface directly into your page without a floating bubble.
Use this option when you want the chat to appear inline within your page layout (e.g., in a dedicated support section).
8. Test your widget
After embedding the code on your website:
Visit your website in a browser
Look for the widget bubble in the position you configured
Click the bubble to open the chat interface
Send a test message to verify the agent responds correctly
Check that colors, branding, and welcome messages appear as configured
If something doesn't look right, return to the widget configuration page in Swiftask and adjust your settings.
Practical use cases
Customer support on your website
Embed a support agent on your website to answer product questions, troubleshooting issues, and common inquiries 24/7. Connect the agent to your product documentation and FAQ so it provides accurate, instant answers.
Lead generation and qualification
Deploy a sales agent that engages visitors, qualifies leads, and collects contact information. Configure starter questions like "What are you looking for?" or "Tell us about your project" to guide conversations.
HR assistant on your careers page
Add an HR agent to your careers page to answer questions about open positions, company culture, and application processes. Reduce the load on your HR team while providing instant responses to candidates.
Internal tool for your team
Embed a specialized agent on your internal portal or intranet to give employees instant access to company policies, IT support, or workflow automation without leaving their workspace.
Tips & best practices
Write a clear welcome message
Your welcome message is the first thing visitors see. Make it friendly, specific, and action-oriented. Instead of "Hello," try "Hi! I can help you find products, answer questions, or connect you with support. What can I do for you?"
Use starter questions to guide users
Starter questions reduce friction and show visitors what your agent can do. Choose 3-4 common questions that represent your agent's main use cases.
Set rate limits to control costs
Widget interactions consume credits from your workspace. Set reasonable rate limits (e.g., 5 messages every 240 seconds) to prevent abuse while allowing genuine users to get help.
Test on multiple devices
Check how your widget looks and behaves on desktop, tablet, and mobile devices. The widget should be responsive and easy to use on all screen sizes.
Monitor usage and refine
Track how visitors interact with your widget. If users ask questions your agent can't answer, add that content to your agent's knowledge base or refine its instructions.
Additional resources
Create ai agent step by step – Build and configure your first agent
Setting objectives & instructions – Define your agent's role and behavior
Sources (knowledge base) – Connect documents to your agent
Skills (AI tools) – Add capabilities like file export and email
Share an agent – Give teammates access to your agent
Ready to deploy your agent on your website? Open your agent, click the pen icon to edit, navigate to Widget settings, customize the appearance, copy the integration code, and paste it into your website. Your agent will be live in minutes.