Creating an Artifact
Written By Stanislas
Last updated 6 months ago
Create professional presentations and interactive web pages with AI in minutes. Whether you need a slide deck, landing page, or dashboard, describe what you want and Swiftask builds it for you—no design or coding skills required.
Overview
An artifact is any piece of content you create in Swiftask using AI assistance: presentations, web pages, dashboards, or interactive documents. Instead of spending hours designing or coding, you describe what you need in a conversation with AI, and it generates complete, ready-to-use content.
Artifacts are collaborative and flexible. You can view them live, edit them manually, iterate with AI feedback, share them with your team, and export them for use elsewhere. Whether you're building a pitch deck for investors or a landing page for a product launch, artifacts let you create professional-quality content fast.
Prerequisites
To create artifacts, you need:
A Swiftask account (sign up at swiftask.ai)
Access to a workspace (you can create your own or join an existing one)
Access to the Artifacts feature (available to all Swiftask users)
Step-by-step guide
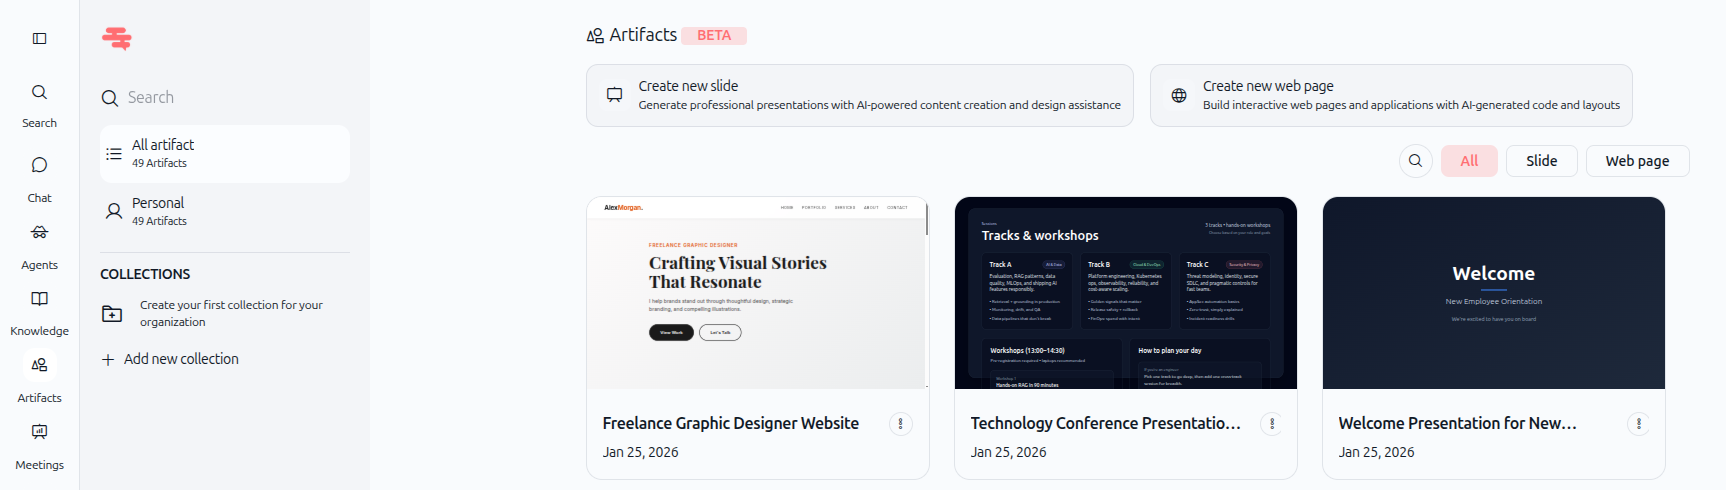
1. Open the Artifacts section
Click Artifacts in the left sidebar. This takes you to your Artifacts library where you can see all your created content and access creation tools.
2. Choose what to create
You'll see two creation buttons at the top of the Artifacts section:
Create new slide – Build professional presentations with multiple slides, custom layouts, and professional design
Create new web page – Build interactive web pages, dashboards, and applications with full functionality
3. Describe what you want to create
A chat window opens where you can talk to AI. Be specific about what you need. Include details like:
Purpose – What is this for? (pitch deck, landing page, product showcase, training material, etc.)
Style – What look and feel do you want? (modern, minimal, professional, colorful, etc.)
Key sections – What should it include? (header, features, testimonials, contact form, etc.)
Content – What information or data should be displayed?
Example: Creating a slide presentation
Prompt:
Create a professional 5-slide presentation about digital marketing. Include a title slide with a modern design, then cover key channels, strategy tips, analytics best practices, and a conclusion slide. Use a blue and white color scheme.
Example: Creating a web page
Prompt:
Build a modern landing page for a cosmetics brand called LUXE. Include a sticky header with navigation (Home, Products, Reviews, Contact), a hero section with the headline "Elevate Your Beauty" and two call-to-action buttons (Shop Now, Learn More), and a features section with 4 icons showing key selling points (Premium Quality, Eco-Friendly, Luxury Experience, Science-Backed).
Type your description and press Enter.
4. Watch AI create your artifact
Swiftask uses AI to generate your content in real time. You'll see the AI working through the process in the chat—it may create slides one by one, adding content and styling as it goes.
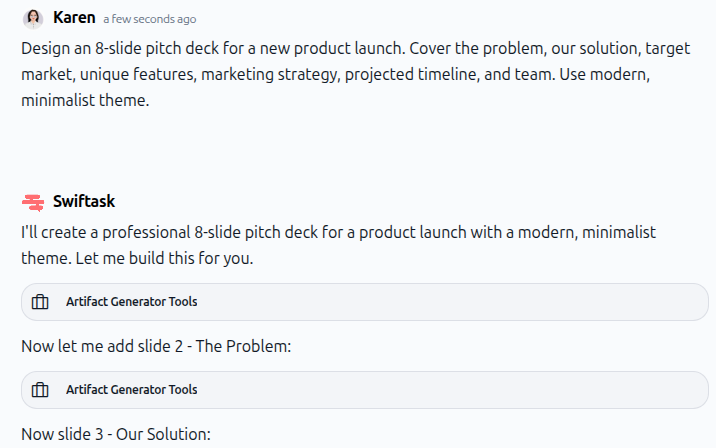
As shown in the image above, the chat panel on the left displays your request and the AI's responses. On the right side, you'll see a live preview of your artifact as it's created. You can watch the progress and see exactly what's being built.
5. View your completed artifact
Once the AI finishes, your artifact is ready. You can see it in full-screen preview mode or continue working with it directly. The artifact is now saved to your Artifacts library.
Working with slides
Once your slide presentation is created, you have a toolbar with several options to view, edit, export, and share your slides.
Slides toolbar
The toolbar at the top of your slide presentation gives you quick access to key functions:

View code – Click the code icon to see the underlying code that powers your presentation. This is useful if you want to understand the structure or make advanced customizations.
Export to PPTX – Click the export icon to download your presentation as a PowerPoint file (.pptx). You can then open it in Microsoft PowerPoint, Google Slides, or any compatible presentation software for further editing or sharing.
Share – Click the share icon to share your presentation with team members. You can assign different roles (User, Admin, Owner) and control what others can do with your slides.
Present in full screen – Click the play icon to start a full-screen presentation mode. Your slides will display in full screen, allowing you to present to your audience without distractions. Use arrow keys or click to navigate between slides.
Edit slides manually – Click the edit icon (pencil) to enter edit mode. You can then modify text, layouts, and other elements directly on your slides without needing AI assistance. This is useful for quick adjustments and fine-tuning.
Delete a slide
Within your presentation, you can delete individual slides that you no longer need. Each slide has a delete icon button (trash icon) in the top corner.

Click the delete icon on any slide to remove it from your presentation. This action removes only that slide, not the entire presentation.
Working with webpages
Once your web page is created, you have a toolbar with several options to view, edit, refresh, and share your webpage.
Webpage toolbar
The toolbar at the top of your webpage gives you quick access to key functions:

View code – Click the code icon to see the underlying HTML, CSS, and JavaScript code that powers your webpage. This is useful for understanding the structure or making advanced customizations.
Refresh web page – Click the refresh icon to reload your webpage and see any recent changes you've made.
Open in new tab – Click the open icon to launch your webpage in a new browser tab. This gives you a full-screen view outside of Swiftask and allows you to test all interactive features.
Share – Click the share icon to share your webpage with team members. You can assign different roles (User, Admin, Owner) and control what others can do with your webpage.
Copy code – Click the copy icon to copy the entire code of your webpage to your clipboard. You can then paste it into your own code editor or hosting platform.
Edit webpage manually – Click the edit icon (pencil) to enter edit mode. You can then modify text, colors, layouts, and other elements directly on your webpage without needing AI assistance. This is useful for quick adjustments and fine-tuning.
What you can do with artifacts
Once your artifact is created, you have several options available through the artifact menu in your Artifacts library as shown below.
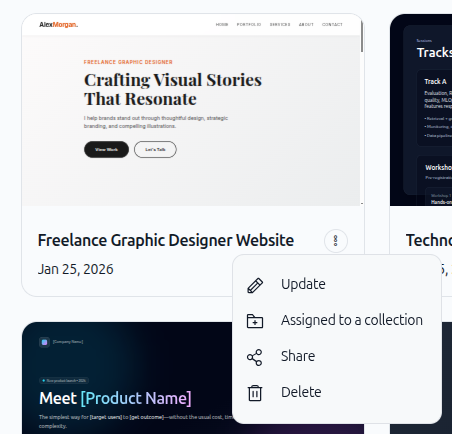
Update the artifact
Click the Update button to redirect to the chat where you created the artifact. From there, you can ask AI to modify, enhance, or redesign your content. For example: "Add two more slides about ROI" or "Change the header color to dark blue" or "Rewrite the hero section to be more compelling."
Assign to a new collection
Click Assign to a collection to organize your artifact. A right panel appears showing available collections.
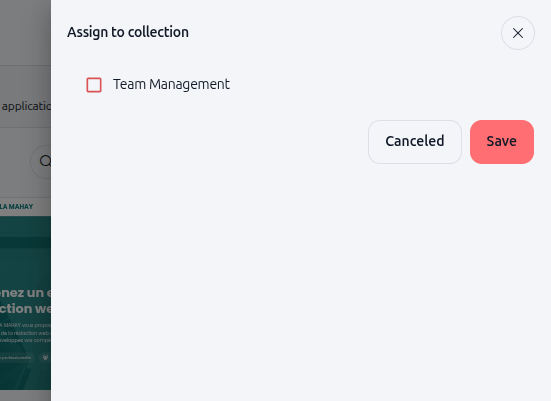
Collections help you keep related artifacts organized by project, client, or topic. Select an existing collection or create a new one to store your artifact. This makes it easy to find artifacts later when you need them.
Share an artifact
Click Share to share your artifact with team members. A dialog opens where you can:
Search for team members – Use the search field to find users by name or email.
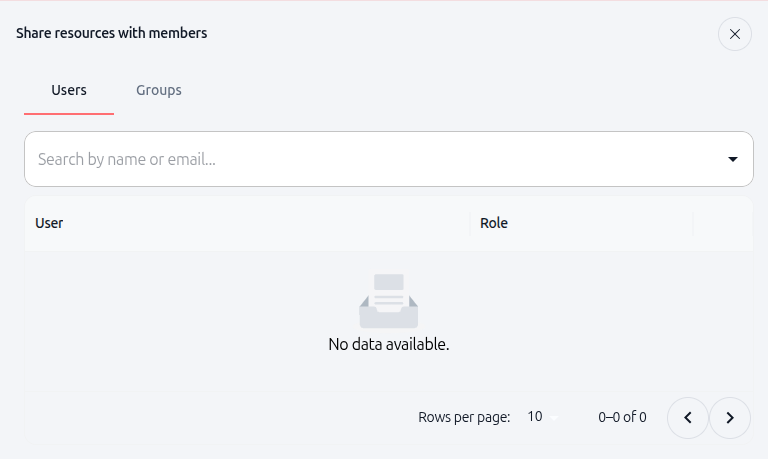
Assign roles – Each person you share with gets a role that determines what they can do:
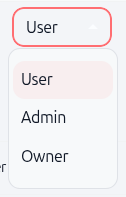
User – Can view and comment on the artifact
Admin – Can view, edit, and manage the artifact
Owner – Has full control including sharing and deleting
Once shared, your teammates can view the artifact, provide feedback, and collaborate on improvements.
Delete an artifact
Click Delete to remove the artifact from your workspace. This action cannot be undone, so use it only when you're certain you no longer need the artifact.
Practical use cases
Marketing pitch deck – Describe your product and target market. AI creates a pitch deck with visuals, key talking points, and a compelling narrative structure. Export it as a PowerPoint file to present to investors.
Team training presentation – Request a training presentation on a specific topic. AI structures it with learning objectives, key concepts, and a summary slide. Present it in full screen to your team.
Product landing page – Describe your product and target audience. AI creates a landing page with hero section, features, benefits, and call-to-action buttons. Share the link with your marketing team or publish it publicly.
Business dashboard – Ask for a dashboard displaying metrics, charts, or key business data in an organized, visual format. Open it in a new tab to see the interactive features and share it with stakeholders.
Tips for getting started
Be specific – The more detail you provide, the better the result. Include purpose, style, target audience, and key content.
Use examples – If you have a reference or example of what you want, mention it in your description.
Iterate gradually – Create a base version first, then ask AI to refine it step by step. This gives you better control over the final result.
Organize with collections – Create collections early to keep your artifacts organized as you build more.
Review and edit – Always review what AI creates. Use the toolbar buttons to view your artifact, then make manual edits for quick fixes or ask AI for bigger changes.
Export and share – Use the export buttons (PPTX for slides, code for webpages) to share your artifacts in different formats with your team.
Next steps
Now that you know how to create artifacts, explore these related guides:
Editing and iterating with artifacts – Learn how to refine your artifacts with AI feedback and manual editing
Sharing and exporting artifacts – Share with your team or download for use elsewhere
Creating slides (artifact) – Detailed guide for presentations
Creating web pages and dashboards (artifact) – Detailed guide for interactive pages
Ready to create your first artifact? Head to the Artifacts section, click either "Create new slide" or "Create new web page," and describe what you need. Swiftask will handle the rest.