Automatic synchronisation
Written By Stanislas
Last updated 6 months ago
Keep your cloud storage files up to date in Swiftask automatically. Instead of manually resyncing documents every time they change, set up automatic synchronisation to refresh your knowledge base on a schedule that works for you.
Automatic synchronisation eliminates the need for manual updates. Your cloud storage documents stay current without any extra effort, ensuring your AI agents always have access to the latest information.
Overview
Automatic synchronisation automatically pulls updates from your source file on a schedule you define. When enabled, Swiftask checks your cloud files at your chosen frequency and updates any changes to your knowledge base.
This is especially useful if your documents change frequently. Instead of remembering to click Resync every time, you set it once and forget it—Swiftask handles the rest.
Prerequisites
To set up automatic synchronisation, you need:
A Swiftask account (sign up at swiftask.ai)
Access to the Knowledge section with permission to manage data sources
Understanding of your update frequency needs (how often documents change)
How it works
When you enable automatic synchronisation:
Swiftask checks your cloud storage at your specified frequency
It detects any changes to files or folders you imported
It automatically updates the indexed content in your knowledge base
Your AI agents instantly have access to the latest information
The synchronisation runs in the background. You don't need to do anything after initial setup.
Step-by-step guide
1. Navigate to your knowledge base
Click Knowledge in the left sidebar. You'll see your data sources and documents.
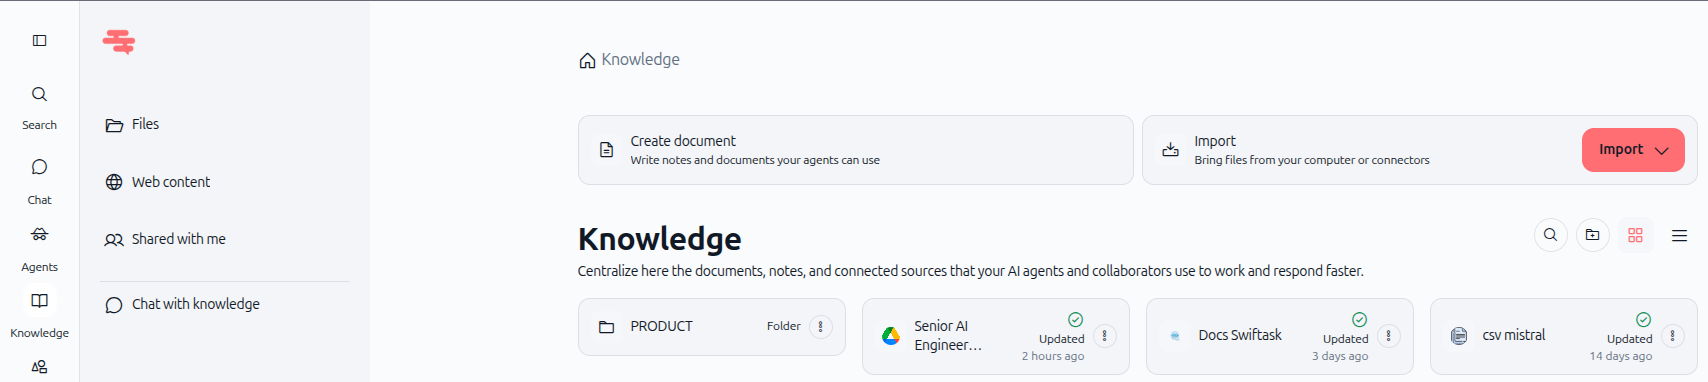
2. Select your cloud storage data source
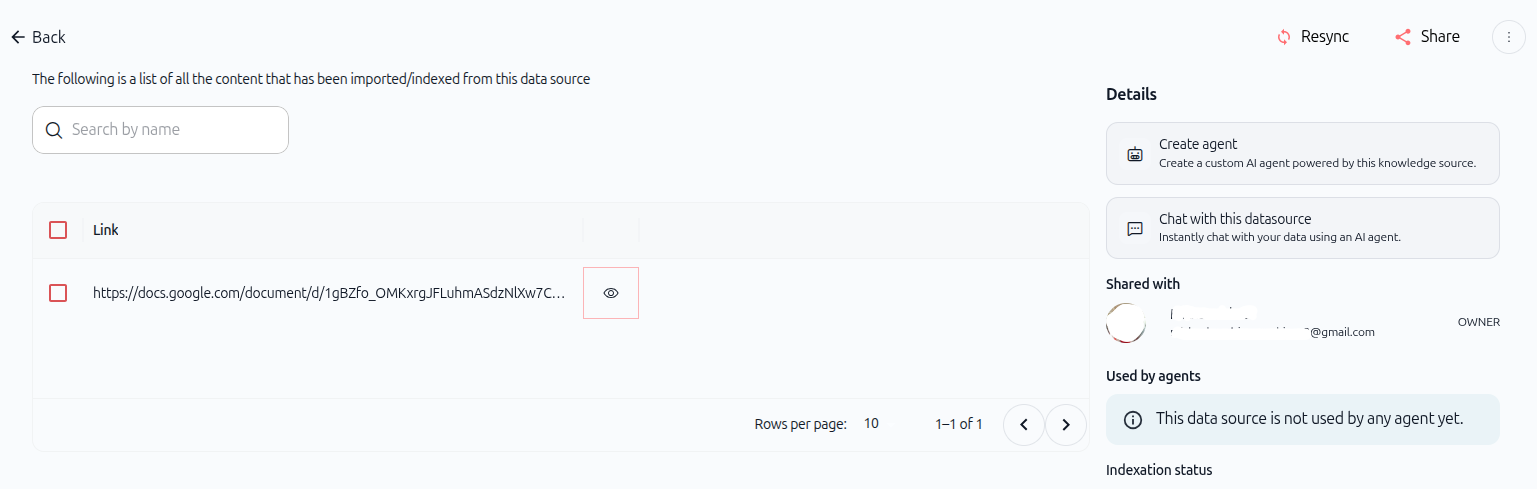
Find the data source you want to set up automatic synchronisation for. Click on it to open the details view.
3. Open the options menu
In the top right of the data source details panel, locate the three-dot menu icon (⋯). Click it to reveal the options menu.
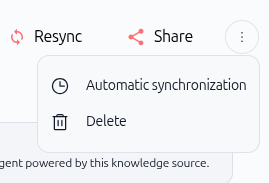
4. Select automatic synchronization
From the dropdown menu, click Automatic synchronization. A configuration modal opens.

5. Configure synchronisation frequency
In the modal that appears, you'll see the Frequency section. This controls how often Swiftask checks your cloud storage for updates.
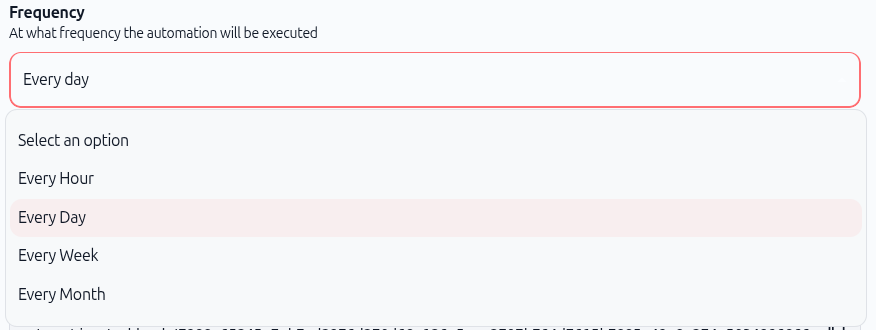
Click the frequency dropdown and select one of these options:
Every Hour – Syncs every 60 minutes
Every Day – Syncs once per day
Every Week – Syncs once per week
Every Month – Syncs once per month
Choose the frequency that matches how often your documents change. If your files update multiple times per day, select Every Hour. If they change less frequently, Every Week or Every Month may be more appropriate.
6. Set the repeat interval (optional)
Below the frequency dropdown, you'll see a Repeat every field. This lets you fine-tune the schedule.
For example:
If you select "Every Day" and set "Repeat every" to 3, syncs happen every 3 days
If you select "Every Hour" and set "Repeat every" to 2, syncs happen every 2 hours
Leave this at 1 for the default frequency without any interval.
7. Review the webhook URL (optional)
The modal displays a Webhook URL (POST) field. This is an optional advanced feature that lets you trigger syncs programmatically from external systems.
You can copy this URL if you need it for integrations, but it's not required for basic automatic synchronisation.
8. Review cost implications
At the bottom of the modal, you'll see an informational message: "Autosync generates additional costs based on the type of data source and the number of files/pages to synchronize."
Automatic synchronisation uses credits based on:
Your data source type (Google Drive, SharePoint, or Dropbox)
The number of files or pages being synced
The frequency of syncs
Consider your usage when choosing a frequency. More frequent syncs consume more credits.
9. Save your settings
Click the Save button (red button in the bottom right) to enable automatic synchronisation with your chosen settings.
Your data source now syncs automatically on your specified schedule.
10. Monitor sync status
Return to your data source details. You'll see:
A Resync button (if you want to manually sync anytime)
The Indexation status showing when the last sync occurred
A list of all imported files
Practical use cases
Product documentation that updates weekly
Your team maintains product docs in Google Drive and updates them every Monday. Set automatic synchronisation to Every Week. Your support agents always have the latest product specs without manual intervention.
Legal documents that change monthly
Your compliance team stores contracts and policies in SharePoint, updating them monthly. Configure automatic synchronisation for Every Month. Your legal agent always references current policies.
Research papers added frequently
You maintain a Dropbox folder of industry research papers, adding new ones throughout the week. Set automatic synchronisation to Every Day so your research agent always has the latest papers available.
Customer feedback from daily exports
Your CRM exports customer feedback to Google Drive daily. Set automatic synchronisation to Every Day so your customer insights agent always has today's feedback.
Tips & best practices
Match the frequency to your update cycle
Don't set syncs more frequently than your documents actually change. If files update weekly, syncing hourly wastes credits. Align frequency with your real update pattern.
Start with manual resync, then automate
Before enabling automatic synchronisation, use the Resync button manually a few times. This helps you understand how often changes actually occur.
Monitor your credit usage
Automatic syncs consume credits. Check your workspace dashboard regularly to see sync costs. If costs are higher than expected, consider a less frequent schedule.
Test with a small data source first
If you're new to automatic synchronisation, start with a smaller data source (fewer files) to understand the cost impact before enabling it on large folders.
Disable if you're not using the source
If a data source isn't being used by any agents, disable automatic synchronisation to save credits. You can always re-enable it later.
Troubleshooting
Syncs aren't happening on schedule
Check that your data source was successfully created and indexed. If the initial import failed, automatic syncs won't run. Try a manual Resync first to verify the connection is working.
Sync costs are higher than expected
Automatic syncs charge based on the number of files and pages processed. If you have many large documents, costs increase. Consider using a less frequent schedule (weekly instead of daily) or reducing the number of files in your source.
Changes to cloud files aren't appearing in Swiftask
Syncs happen on your configured schedule, not immediately. If you just updated a file, wait until the next sync window. For urgent updates, use the Resync button for an immediate manual sync.
Webhook URL isn't working
The webhook URL is optional and only needed for programmatic triggers. If you don't plan to use it, you can ignore it. Contact Swiftask support if you need help setting up webhook integrations.
Additional resources
Knowledge base – Introduction – Learn what knowledge base is and why it matters
Import from cloud (Google Drive, SharePoint, Dropbox) – Set up your first cloud storage import
Import documents / files – Upload files directly from your computer
Permissions and access – Control who can see and use your knowledge base
Creating an agent – Build an agent and connect it to your knowledge base
Ready to automate your knowledge base? Navigate to your cloud storage data source, click the three-dot menu, and select Automatic synchronization. Choose your frequency and save. Your documents will stay current automatically.