Create Document
Written By Stanislas
Last updated 6 months ago
Write notes and internal documents directly in Swiftask that your AI agents can access. Creating documents in the knowledge base lets you build custom reference materials, guidelines, and knowledge resources without uploading external files—perfect for internal documentation, agent instructions, and quick knowledge capture.
Overview
The create document feature lets you write and store documents directly inside Swiftask's knowledge base. Instead of uploading files from your computer, you create content using a built-in editor with full formatting support. These documents are automatically processed, indexed, and made available to agents across your workspace.
Use create document when you need to:
Write internal guidelines or policies that don't exist elsewhere
Create reference materials specifically for your agents
Build custom knowledge bases from scratch
Document processes, workflows, or instructions quickly
Prerequisites
To create documents in the knowledge base, you need:
A Swiftask account (sign up at swiftask.ai)
Permission to create or edit knowledge base content in your workspace
Basic understanding of your knowledge base structure (folders and organization)
Step-by-step guide
1. Navigate to the knowledge base
Click Knowledge in the left sidebar. You'll see the knowledge interface with all your data sources and documents.
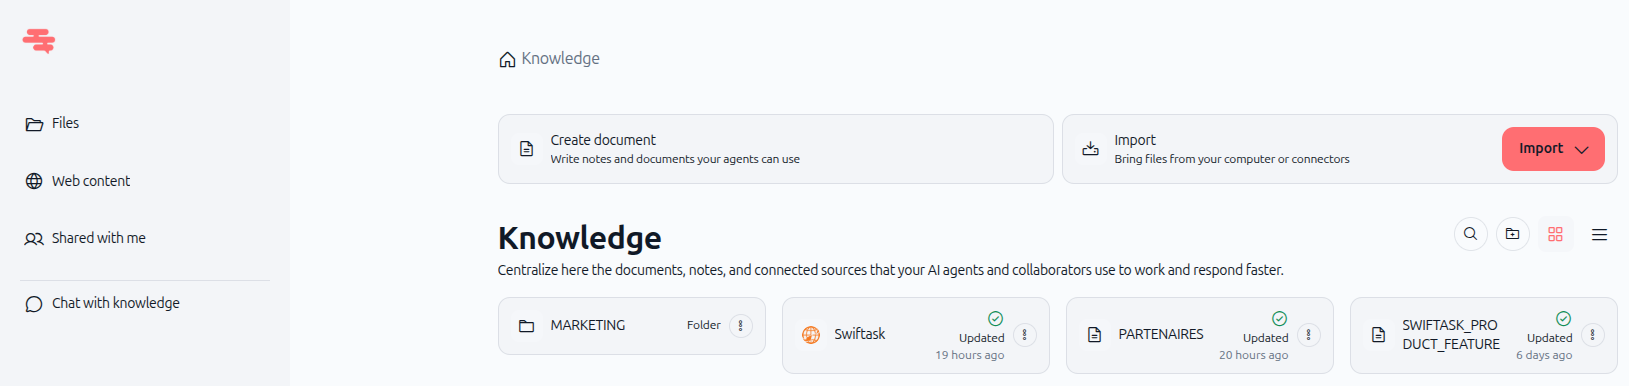
2. Click create document
In the knowledge interface, click the Create document button. This opens the document editor where you can write or paste content.
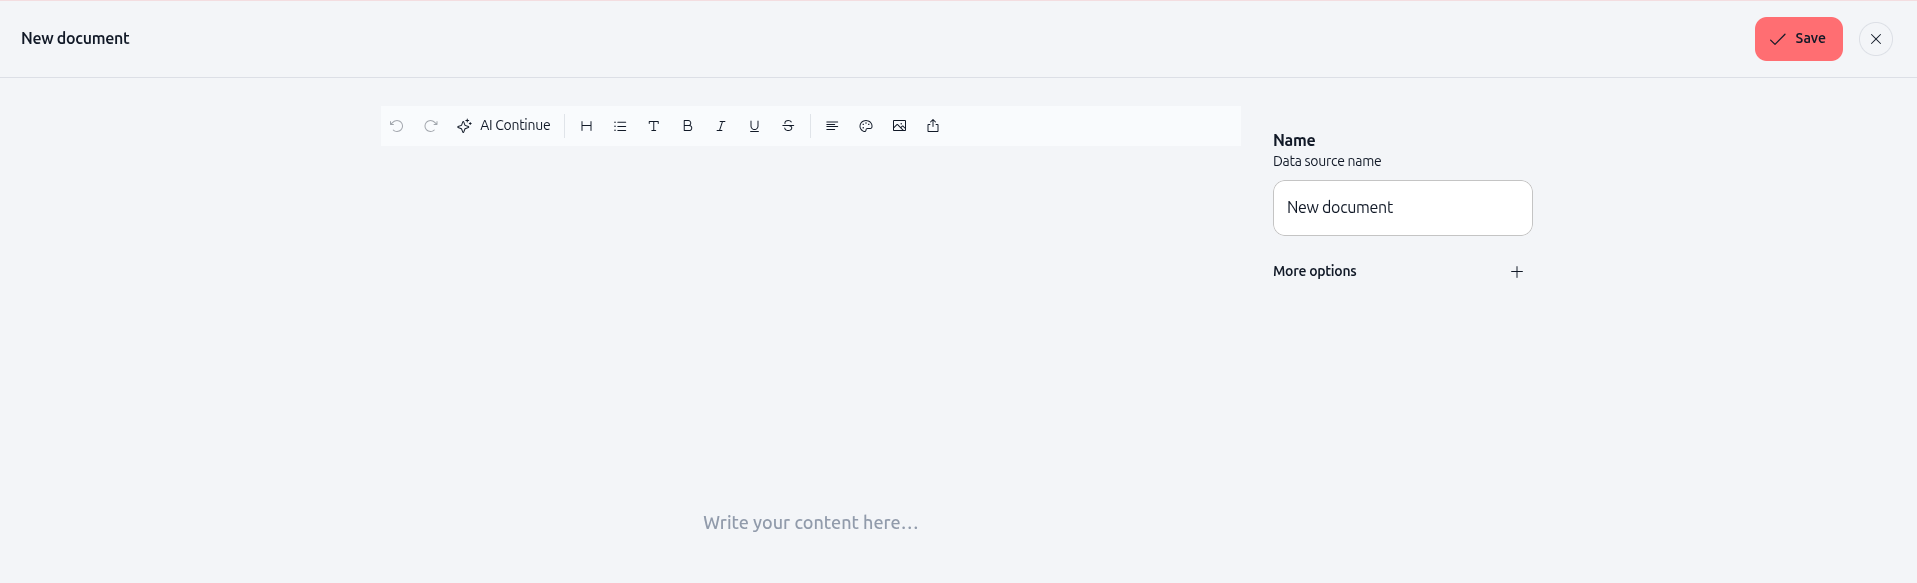
The editor opens with:
A blank writing area in the center
A Name field on the right (for the data source name)
More options section for advanced configuration
3. Write your content
Type or paste your content directly into the editor. The editor supports:
Plain text
Formatted text (headings, lists, bold, italic)
Structured content for better agent understanding
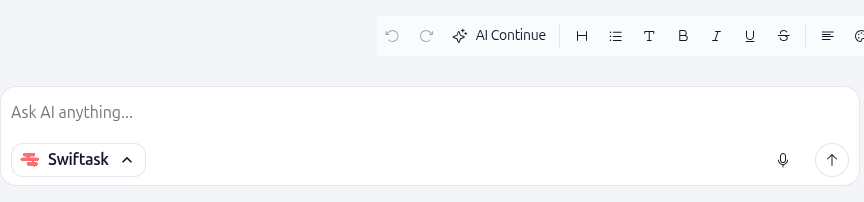
You can also use the AI Continue button in the toolbar to let AI help you expand or complete your content.
Example content:
HR Department Handbook

Recruitment Guidelines

All recruitment must follow these steps:
1. Post job description internally for 7 days
2. Review internal candidates first
3. External posting only after internal review
4. Interview panel must include HR representative

Salary Ranges
- Entry level: $45,000 - $55,000
- Mid level: $60,000 - $80,000
- Senior level: $85,000 - $120,000
4. Name your document
In the Name field on the right, enter a clear, descriptive name for your data source.
Good names:
"HR Hiring Standards 2025"
"Product Manual v3.2"
"Customer Support Guidelines"
Avoid:
"Document 1"
"Untitled"
Generic names
5. Configure advanced options (optional)
Click More options to reveal advanced settings:
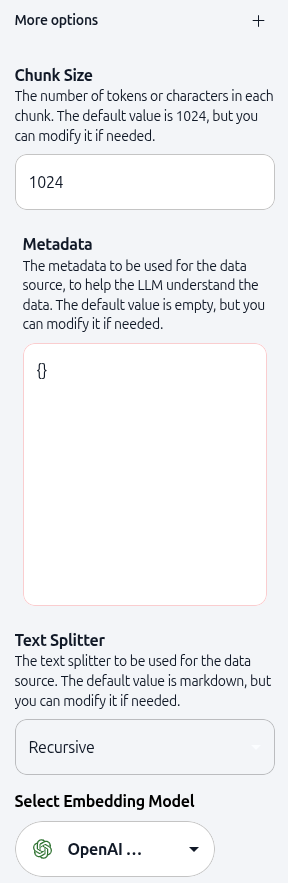
Chunk size: The number of tokens or characters in each chunk. Default is 1024. Smaller chunks provide more precise retrieval; larger chunks provide more context. Keep the default unless you have specific needs.
Metadata: Add custom metadata as JSON to help AI understand your content. This is optional but useful for adding context.
Example metadata:
{
  "department": "HR",
  "year": "2025",
  "document_type": "policy",
  "version": "1.0"
}
Text splitter: Choose the method for splitting text content. Default is recursive. Options include:
Recursive (default, works for most content)
Markdown (for markdown-formatted documents)
Other specialized splitters
Select embedding model: Choose the AI model used to create vector embeddings. Default is OpenAI Text Embedding 3 Small. This determines how your content is indexed and searched.
6. Save and process
Once your content is ready, click the Save button (checkmark icon) in the top-right corner.
Swiftask processes your document in the background:
Content is split into chunks based on your chunk size setting
Chunks are embedded using the selected embedding model
The document is indexed and made searchable
Your data source appears in the knowledge section
You'll see a progress indicator. Once complete, your document is ready to use.
7. View your created document
After processing, navigate back to the knowledge section. Your new document appears in the list with:
Document name
Type indicator (document icon)
Last updated timestamp
Status (indexed and ready)
Practical use cases
Internal policy documentation
Write company policies, procedures, and guidelines directly in Swiftask. Create an HR agent that references these policies when answering employee questions about benefits, leave, or workplace rules.
Agent instruction manuals
Document how your agents should behave, what tone to use, and what information to prioritize. Connect these instruction documents to your agents so they follow consistent standards.
Quick knowledge capture
Capture meeting notes, project decisions, or tribal knowledge quickly. Instead of creating external documents and uploading them, write directly in Swiftask and make the information immediately available to your team and agents.
Custom reference materials
Build custom glossaries, FAQs, or reference guides specific to your organization. Agents can use these documents to provide accurate, context-aware responses using your terminology and standards.
Tips & best practices
Use clear structure
Organize your content with headings, bullet points, and numbered lists. Structured content is easier for agents to parse and reference accurately.
Keep documents focused
Instead of one massive document covering everything, create multiple focused documents. For example, separate "Recruitment Guidelines" from "Interview Process" from "Salary Ranges." This improves retrieval accuracy.
Add metadata for context
Use the metadata field to add information that helps AI understand your document. Include department, date, version, document type, or any other relevant context.
Update regularly
Documents in the knowledge base should stay current. If your policies or procedures change, edit the document directly in Swiftask. Agents always use the latest version.
Test after creating
After creating a document, test your agents by asking questions that should reference the new content. Verify that agents cite the correct information and provide accurate answers.
What happens next
Once you've created your document, you're ready to:
Connect to agents – Link your document to existing agents to enhance their knowledge
Chat with your data – Use the "Chat with this datasource" feature to test how agents interpret your content
Share with teammates – Give team members access to your knowledge base
Organize with folders – Move your document into folders to keep your knowledge base structured
Your document is now indexed, searchable, and ready to power AI-driven workflows across your workspace.
Additional resources
Knowledge base – Introduction – Learn what knowledge base is and why it matters
Import documents / files – Upload files from your computer
Import website and web pages – Add web content to your knowledge base
Permissions and access – Control who can see and use your knowledge base
Creating an agent – Build an agent and connect it to your knowledge base
Ready to create your first document? Click Knowledge in the sidebar, then Create document. Start writing, configure your settings, and save. Your document will be indexed and available to agents immediately.