Create agent from template
Written By Stanislas
Last updated 6 months ago
Start building custom AI agents faster with pre-configured templates. Agent templates provide ready-to-use configurations that you can customize in minutes, saving time while maintaining best practices for agent design.
Templates are ideal when you need a specific type of agent quickly or want to learn how to configure agents effectively by studying working examples.
Overview
Creating an agent from a template lets you skip the initial setup and jump straight to customization. Each template comes pre-configured with:
Objectives and instructions – A defined role, tasks, and behavioral rules
Recommended AI model – The optimal model for the template's purpose
Suggested knowledge base structure – Guidance on what documents to add
Pre-configured settings – Department, description, and other profile details
Swiftask offers multiple templates, including a blank template for starting fresh and specialized templates like the knowledge assistant for RAG (Retrieval-Augmented Generation) use cases.
Prerequisites
To create an agent from a template, you need:
A Swiftask account (sign up at swiftask.ai)
Access to the Agents section
Permission to create agents in your workspace
Agents are available to all Swiftask users.
Step-by-step guide
1. Navigate to the agents section
Click Agents in the left sidebar to open the agents workspace.
2. Click the create agent button
Locate the Create agent button in the top section of the agents page and click it.
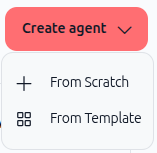
A dropdown menu appears with two options:
From Scratch – Build an agent from the ground up
From Template – Start with a pre-built template and customize it
3. Select from template
Click From Template in the dropdown menu.
The agent templates page opens, displaying all available templates in your workspace.
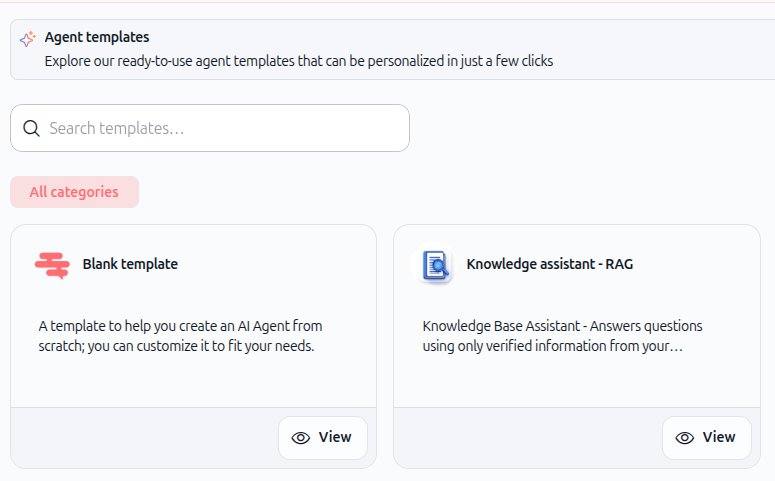
You'll see:
Search bar – Find templates by name or keyword
Category filter – Filter templates by category (shows "All categories" by default)
Template cards – Each card displays the template name, description, and a View button
4. Preview a template
Before creating an agent from a template, you can preview its configuration to understand what it includes.
Click the View button on any template card.
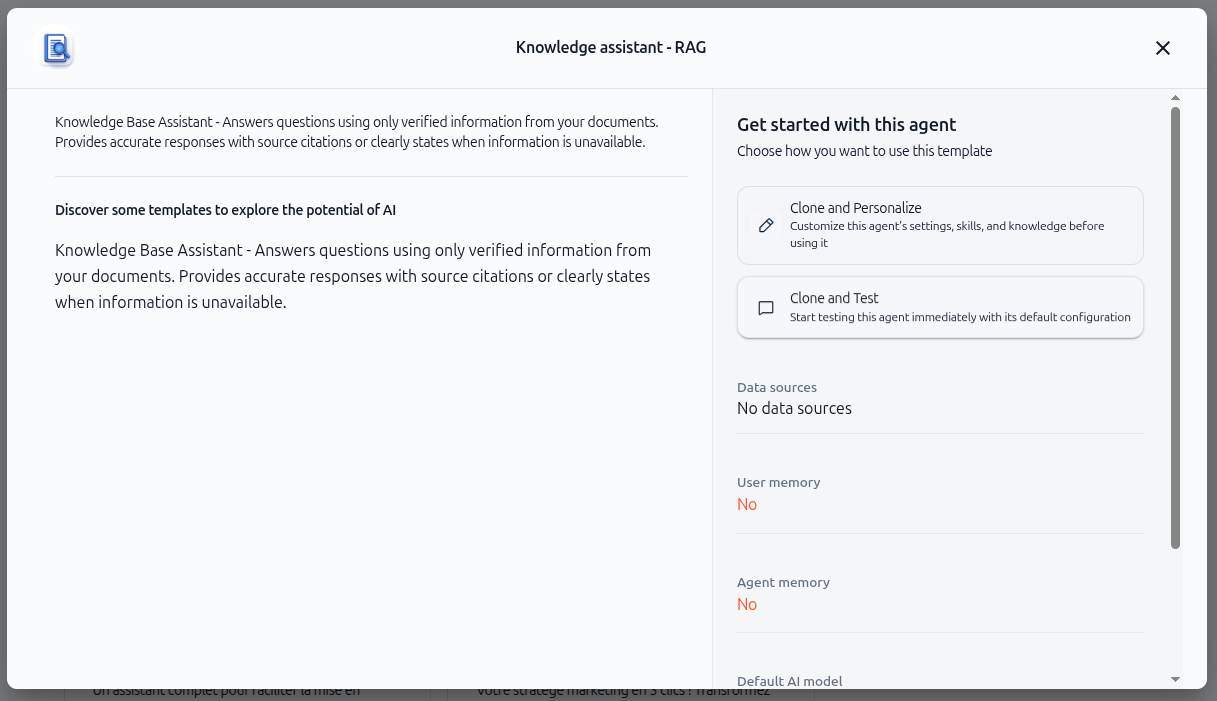
A preview modal opens showing:
Template name and description – What the template does and its intended use case
Full template details – The complete objectives, instructions, and configuration
Get started with this agent section – Two options for using the template:
Clone and personalize – Customize this agent's settings, skills, and knowledge before using it
Clone and test – Start testing this agent immediately with its default configuration
Data sources – Lists connected knowledge base sources (if any)
User memory – Shows if user memory is enabled
Agent memory – Shows if agent memory is enabled
Default AI model – The AI model powering this template
5. Choose how to use the template
You have two options:
Clone and personalize
Redirects you to the agent configuration page
Customize the agent's name, description, objectives, instructions, knowledge base, and skills
Ideal when you want to adapt the template to your specific needs before testing
Clone and test
Redirects you directly to the chat interface
Start using the agent immediately with its default configuration
Ideal when you want to test the template quickly before making changes
Select the option that matches your workflow.
6. Customize your agent (if you chose clone and personalize)
If you selected Clone and personalize, you're taken to the agent configuration page.
From here, you can:
Update the agent profile – Change the name, description, department, and AI model
Refine objectives and instructions – Adjust the system prompt to match your use case
Add knowledge sources – Connect documents, files, or data sources your agent should access
Configure skills – Add tools and integrations your agent can use (export files, send emails, etc.)
Test your agent – Use the test panel on the right side to verify your changes
Once you're satisfied with your configuration, click Use this agent to start using it in chat.
Practical use cases
Knowledge base assistant for customer support
Use the knowledge assistant - RAG template and connect your product documentation, FAQ documents, and troubleshooting guides. The agent answers customer questions using only verified information from your knowledge base, reducing errors and ensuring consistency.
Blank template for custom workflows
Start with the blank template when you need a highly customized agent. Use it as a foundation and build your agent's objectives, knowledge base, and skills from scratch while maintaining a clean starting point.
Department-specific agents
Clone a template and customize it for different departments. For example, create an HR agent from the blank template by adding recruitment guidelines, or create a legal compliance agent by connecting regulatory documents and internal policies.
Testing and learning
Use the clone and test option to explore how pre-configured agents work. Study the template's objectives, instructions, and configuration to learn best practices for building your own agents.
Tips & best practices
Customize the system prompt
Templates provide a solid foundation, but you should always review and adjust the objectives and instructions to match your specific use case. Add rules, constraints, and tasks that reflect your organization's needs.
Add your knowledge base
Most templates work best when connected to your organization's specific documents and data sources. After creating an agent from a template, navigate to the knowledge base section and add relevant documents.
Troubleshooting
The template doesn't match my needs exactly
Templates are starting points, not final solutions. Use the configuration page to adjust objectives, instructions, knowledge sources, and skills until the agent matches your requirements.
I can't find the right template
If no template matches your use case, use the Blank template to start from scratch or select the closest template and heavily customize it.
The agent isn't performing as expected after cloning
Test your agent thoroughly after cloning. Templates provide a foundation, but you may need to refine the system prompt, add specific knowledge sources, or configure skills to achieve optimal results.
What happens next
Once you've created your agent from a template, you're ready to:
Test and refine – Use the test panel or chat interface to verify your agent works as expected
Add knowledge sources – Connect documents and data sources your agent should access
Configure skills – Add tools and integrations your agent can use to perform actions
Share with your team – Make your agent available to teammates or deploy it for external use
Your agent is now ready to use. Continue refining it based on real-world testing results.
Additional resources
Setting objectives & instructions – Learn how to refine your agent's system prompt
Sources (knowledge base) – Connect documents and data to your agent
Skills (AI tools) – Add capabilities like file export, email, and database queries
Testing & iterations – Test your agent and refine based on results
Introduction to agents – Learn what agents are and how they differ from chat
Ready to create your first agent from a template? Navigate to the Agents section, click "Create agent," select "From Template," and explore the available options. Your agent will be ready in minutes.