Governance & oversight
(costs, usage, internal policies)
Written By Stanislas
Last updated 6 months ago
Governance and oversight give workspace admins the tools to monitor costs, control resource consumption, enforce access policies, and maintain financial accountability. By setting credit limits, tracking usage, and managing permissions, you ensure your workspace operates efficiently within budget while maintaining security and compliance.
Effective governance prevents budget overruns, identifies resource-intensive activities, and ensures team members have appropriate access to workspace features. This guide shows you how to monitor workspace activity, control costs, and enforce internal policies.
Overview
Governance and oversight in Swiftask workspace administration focuses on three core areas:
Financial oversight
Monitor credit consumption across your workspace
Set individual member credit limits to control spending
Track usage patterns and identify top consumers
Plan capacity and manage subscription costs
Access control
Enforce role-based permissions
Configure granular authorizations for specific features
Restrict sensitive operations (delete, share, update)
Maintain data security and compliance
Operational monitoring
Track workspace capacity and member enrollment
Monitor feature usage across the team
Audit member activity and status
Ensure workspace resources are used efficiently
Prerequisites
To manage governance and oversight, you need:
Admin or Owner role in your workspace
Access to Workspace administration
Understanding of your workspace's subscription plan and limits
Financial oversight & budget management
Understanding credit-based governance
Swiftask uses a credit system to track AI consumption across your workspace. Every AI interaction—whether in Chat, Agents, Meetings, or Artifacts—consumes credits based on the model used and the complexity of the task.
Why credit limits matter:
Without proper controls, a single user could consume the entire workspace budget. Credit limits prevent "bill shock" and ensure fair resource distribution across your team.
Setting member credit limits
To set a monthly credit limit for an individual member:
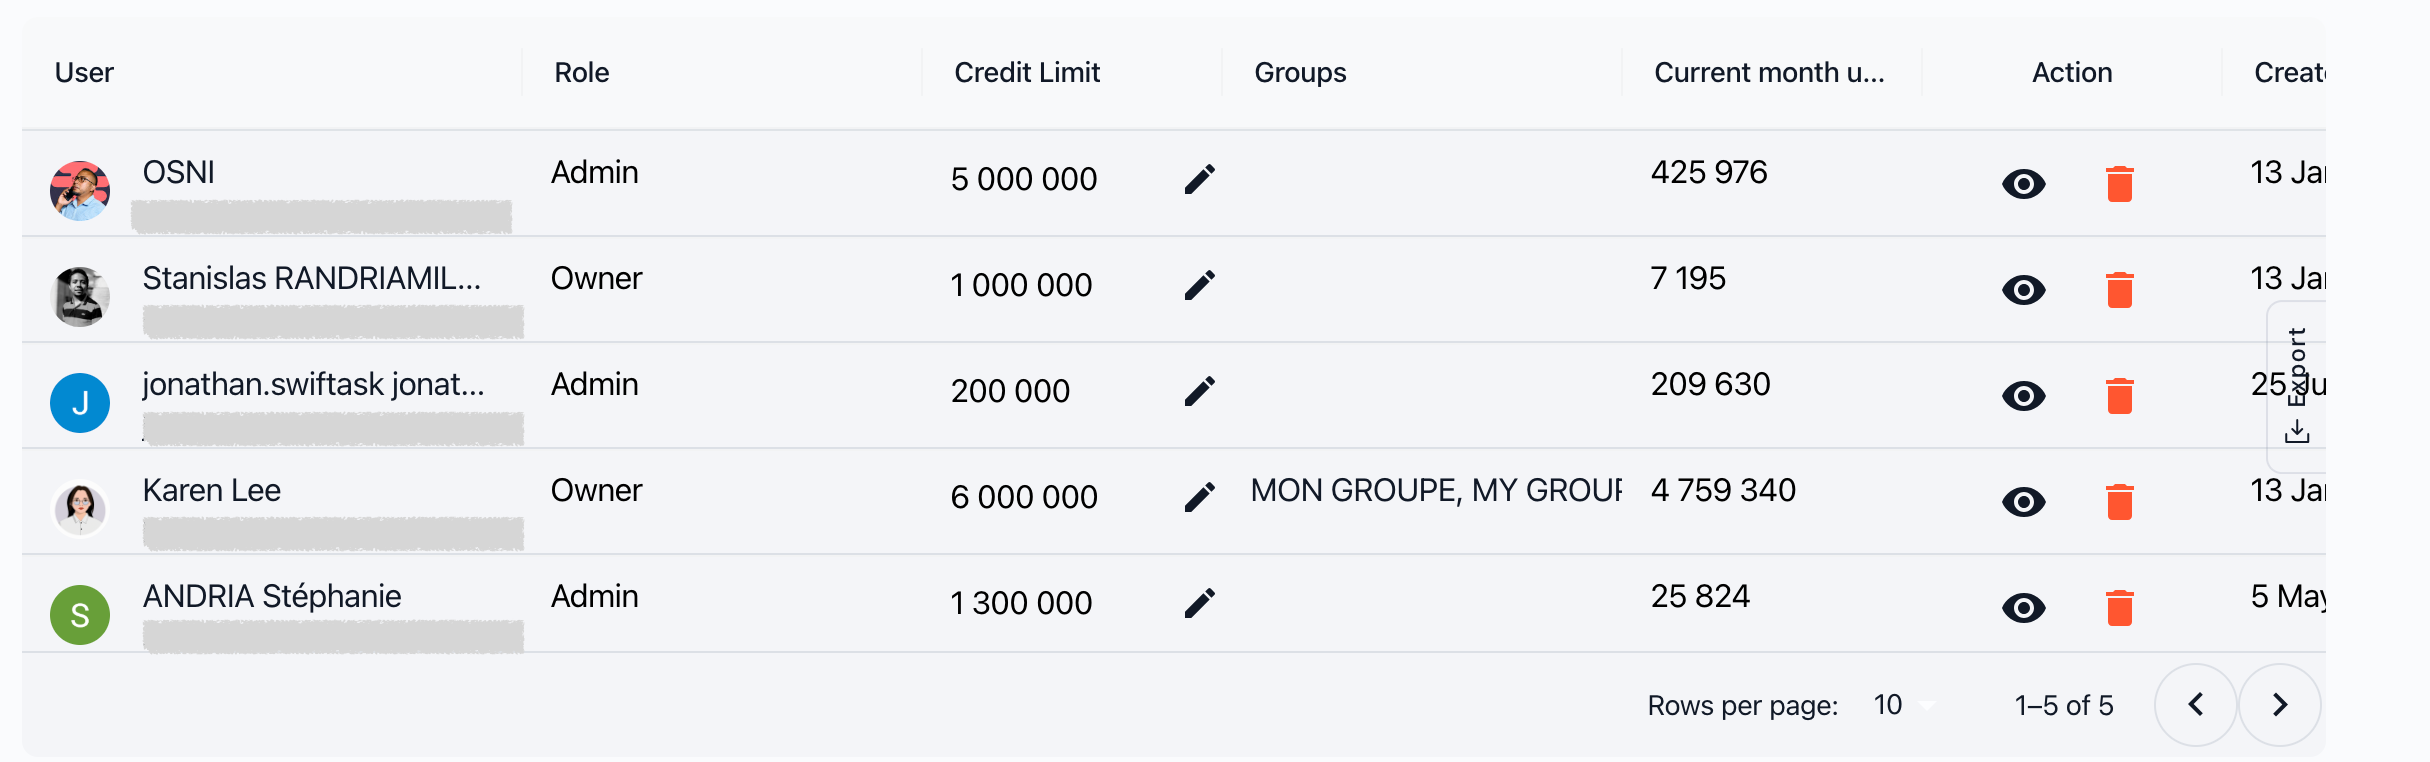
Navigate to Workspace administration → Members
Find the member in the list
Click the eye icon in the Action column
In the Member Details view, locate the Monthly limit (Credits) field
Enter a numerical value (e.g., 20,000 credits)
Click Validate
What happens when a member reaches their limit:
They receive a warning as they approach their cap
Once the limit is reached, they cannot consume additional credits
Admins can increase the limit or wait for the monthly reset
Best practices for credit allocation:
Admins and power users: Higher limits (50,000–100,000 credits)
Standard members: Moderate limits (20,000–50,000 credits)
Occasional users: Lower limits (5,000–20,000 credits)
Viewers: No credit allocation needed (read-only access)
Monitoring member usage
The Members list provides real-time visibility into credit consumption:
Current Month Usage column:
Each member has a visual progress bar showing:
Credits consumed this month
Percentage of their monthly limit used
Remaining credits available
Identifying top consumers:
Scan the Current Month Usage column to quickly identify members who are:
Approaching their credit limits
Consuming significantly more than others
Potentially using inefficient AI models or workflows
Example usage monitoring:
Member A: ████████░░ 80% (16,000 / 20,000 credits) Member B: ███░░░░░░░ 30% (6,000 / 20,000 credits) Member C: ██████████ 100% (20,000 / 20,000 credits) ⚠️ Member C has hit their limit and needs either an increased allocation or should wait for the monthly reset.
Capacity planning & workspace limits
Understanding workspace capacity
Every Swiftask plan includes a specific number of member slots. Managing capacity ensures you don't exceed your plan limits and helps you plan for team growth.
Capacity indicator:
At the top of the Members section, you'll see your enrollment status:
Your plan currently has 5 out of 10 users enrolled, which means it is at 50% capacity. You can add 5 more users. This shows:
Total slots: 10 members
Used slots: 5 members
Available slots: 5 members
Capacity percentage: 50%
Planning for growth
When to upgrade:
Consider upgrading your plan when:
You're at 80% capacity or higher
You need to add multiple members soon
You're frequently removing inactive members to make room
Your team is growing faster than your plan allows
Capacity management strategies:
Remove inactive members – Free up slots by removing users who no longer need access
Use Viewer roles strategically – Viewers count toward your member limit but consume fewer resources
Monitor pending invitations – Cancel invitations that haven't been accepted within a reasonable timeframe
Plan upgrades in advance – Don't wait until you're at 100% capacity to upgrade
Subscription impact
Billing is tied to member count:
When you invite new members, the interface displays a clear warning:
⚠️ Inviting additional users will increase your subscription billing. Each new user adds a charge to your monthly subscription. Cost planning:
Review your current plan pricing
Calculate the cost per additional member
Budget for team growth before inviting new users
Consider annual plans for cost savings on larger teams
Functional governance & access policies
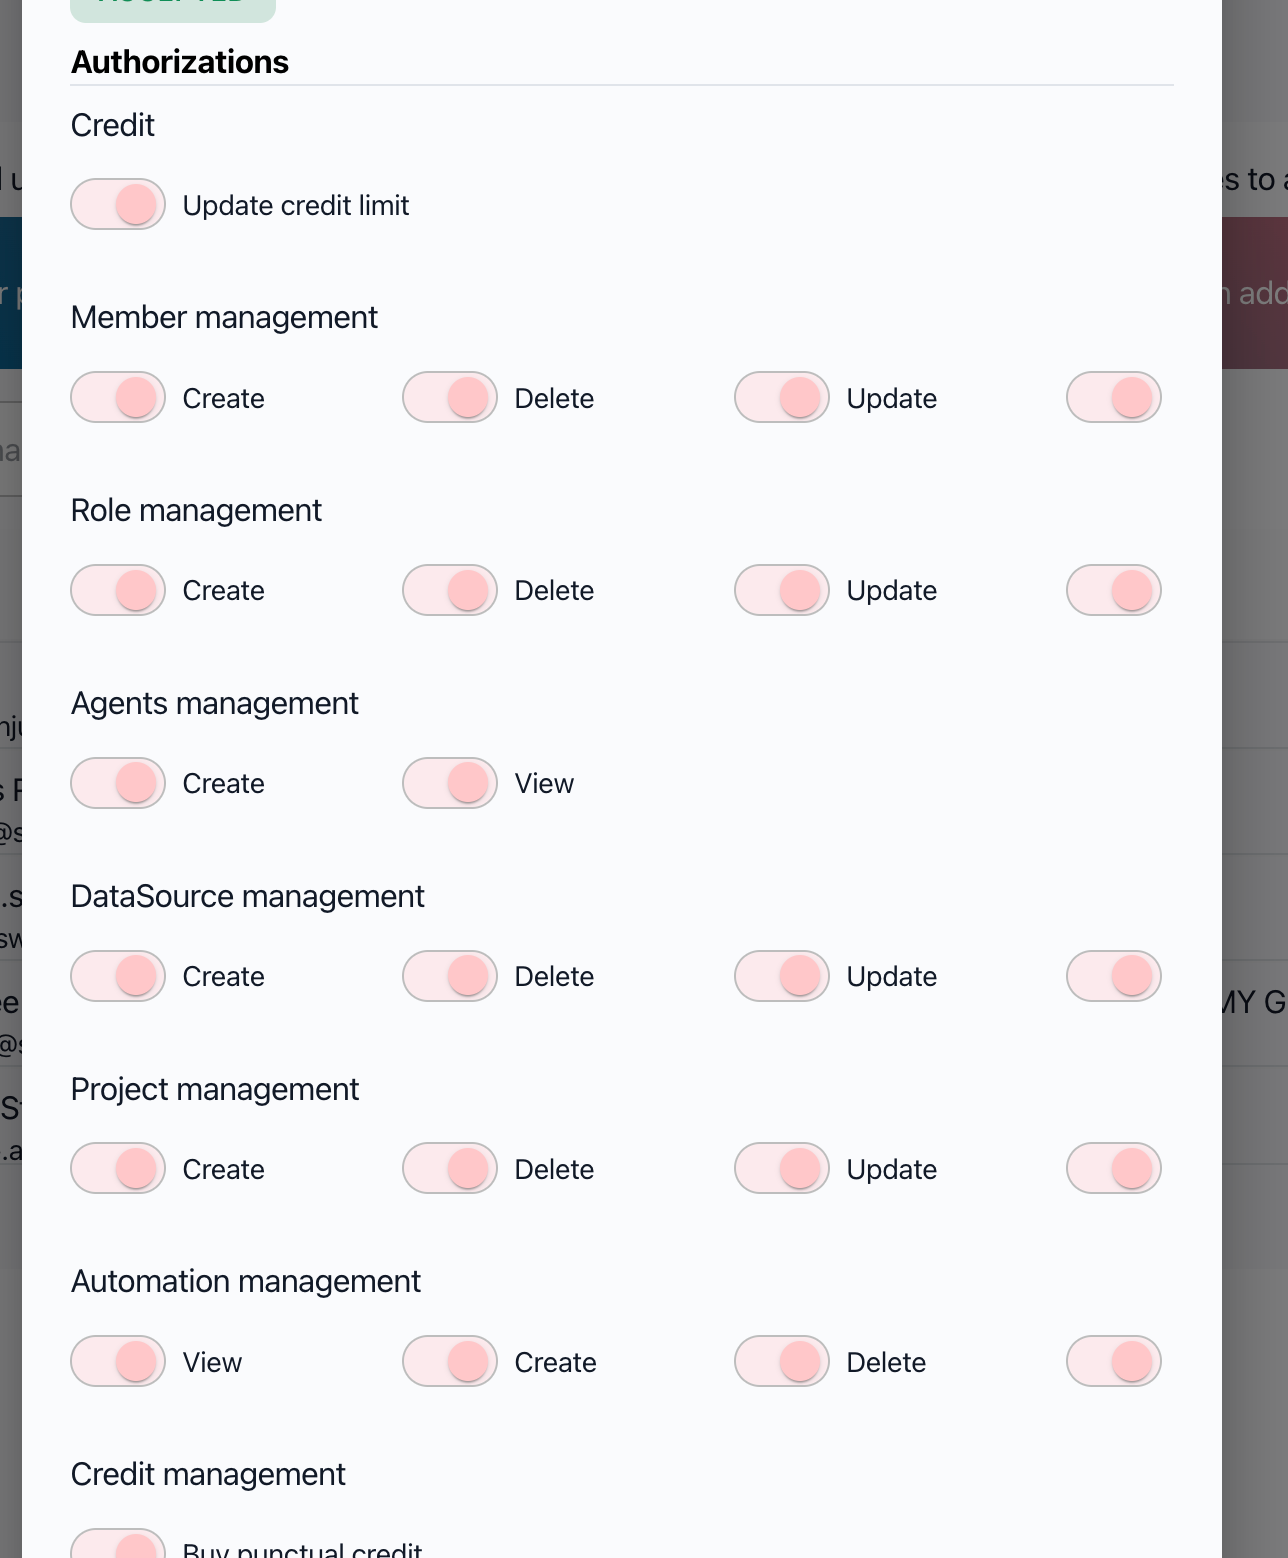
Understanding the authorizations matrix
Swiftask uses a granular permissions system that goes beyond basic roles. Admins can control exactly what each member can do with specific features.
Authorizations categories:
Member Management – Who can invite, update, or remove members
DataSource Management – Control over knowledge base and data sources
Agent Management – Permissions for creating, editing, and deleting agents
Automation Management – Control over workflow automations
Artifact Management – Permissions for slides, web pages, and documents
Meeting Management – Access to meeting recordings and transcriptions
Project Management – Control over project creation and collaboration
Subscription Management – Access to billing and plan changes
Billing Management – Invoice and payment management
Configuring granular permissions
To customize permissions for a specific member:
Navigate to Workspace administration → Members
Click the eye icon next to the member's name
In the Member Details view, scroll to the Authorizations section
Toggle specific permissions on or off
Example: Restricting delete permissions
You can allow a Member to create and update DataSources but prevent them from deleting:
View: ✓ Enabled
Create: ✓ Enabled
Update: ✓ Enabled
Delete: ✗ Disabled
Share: ✗ Disabled
This ensures your knowledge base remains intact while still allowing the member to contribute.
Enforcing data security policies
Protecting sensitive data:
Use authorizations to enforce internal data policies:
Knowledge base protection:
Disable Delete permissions for DataSources to prevent accidental data loss
Restrict Share permissions to prevent unauthorized data distribution
Limit Update access to designated data managers
Collaboration control:
Use Artifact Management toggles to control who can share presentations and documents
Restrict Project Management permissions to prevent unauthorized project creation
Control Agent Management to ensure only trained users build AI workflows
Compliance and auditing:
Disable Subscription Management for all non-admin users
Restrict Billing Management to Owners and Billing Partners only
Use View Only permissions for auditors and stakeholders
Member lifecycle governance
Onboarding governance
When inviting new members:
Choose the appropriate role based on their job function
Set a credit limit appropriate for their expected usage
Review billing impact before sending the invitation
Configure granular permissions if the default role doesn't match their exact needs
Ongoing monitoring
Weekly governance tasks:
Review the Current Month Usage column to identify unusual consumption
Check for members approaching their credit limits
Monitor workspace capacity percentage
Review pending invitations and cancel outdated ones
Monthly governance tasks:
Audit member roles and ensure they're still appropriate
Review credit allocations and adjust based on actual usage patterns
Check for inactive members who should be removed
Analyze top consumers and optimize their workflows
Quarterly governance tasks:
Full member access audit
Review and update internal access policies
Plan for team growth and potential plan upgrades
Document any custom permission configurations
Offboarding governance
When removing members:
Review their owned resources – Check agents, projects, and data sources they created
Transfer ownership – Reassign critical resources to active members
Document their access – Keep a record of what they had access to
Remove their account – Click the trash icon in the Members list
Verify removal – Confirm they can no longer access the workspace
Governance summary table
Practical use cases
Preventing budget overruns
Set conservative credit limits for all new members (e.g., 10,000 credits). Monitor their usage for the first month, then adjust limits based on actual consumption patterns.
Protecting the knowledge base
Create a "Data Manager" role by taking a Member and disabling Delete permissions for DataSources. This allows them to add and update documents without risking accidental deletions.
Managing seasonal teams
If you have contractors or seasonal workers, use the Viewer role for those who only need visibility. When they need active access, upgrade them to Member temporarily, then downgrade when the project ends.
Controlling costs during high-usage periods
During busy periods, temporarily reduce credit limits across all members to prevent budget exhaustion. Communicate the change and provide guidance on using more cost-effective AI models.
Ensuring compliance for auditors
Create Viewer accounts for external auditors. They can see all workspace activity, member lists, and project structures without the ability to modify anything or access billing information.
Tips & best practices
Start with conservative limits
Set lower credit limits initially and increase them based on actual usage. It's easier to raise limits than to recover from budget overruns.
Monitor weekly, adjust monthly
Check usage weekly to catch issues early. Make credit limit adjustments monthly based on established patterns.
Document custom permissions
If you create custom permission configurations (e.g., a Member with restricted delete access), document why and for whom. This helps during audits and role reviews.
Use roles as templates, permissions for exceptions
Assign standard roles (Member, Viewer) to most users. Use granular permissions only for special cases that don't fit standard roles.
Communicate credit policies
Make sure your team understands:
How credits work
What their monthly limit is
What happens when they reach their limit
How to request limit increases
Plan capacity proactively
Don't wait until you're at 100% capacity to upgrade. Start planning when you reach 75% to avoid delays in onboarding new members.
Review permissions quarterly
People's roles change. Review permissions every quarter to ensure members still have appropriate access levels.
Troubleshooting
Issue: Member exceeded their credit limit
Symptoms: Member reports they can't use AI features.
Solution:
Navigate to Members → Click eye icon next to their name
Check Current Month Usage – if at 100%, they've hit their limit
Options:
Increase their Monthly limit (Credits)
Wait for monthly reset
Reallocate credits from underutilized members
Issue: Workspace approaching capacity
Symptoms: Enrollment shows 90%+ capacity.
Solution:
Review member list for inactive users
Remove members who no longer need access
Consider upgrading to a higher plan
Navigate to Subscription to view upgrade options
Issue: Unable to set granular permissions
Symptoms: Authorization toggles are grayed out.
Cause: You may not have sufficient permissions.
Solution:
Only Owners and Admins can modify authorizations
Verify you have the correct role
Contact the workspace Owner if you need access
Issue: High credit consumption by specific member
Symptoms: One member uses significantly more credits than others.
Investigation:
Check their Current Month Usage percentage
Review what features they're using most
Investigate if they're using high-cost AI models
Solutions:
Provide guidance on using cost-effective models
Reduce their credit limit if usage is unnecessary
Optimize their workflows to reduce consumption
Ready to govern your workspace? Navigate to Workspace administration → Members to start monitoring usage, setting credit limits, and enforcing access policies.