Seeting objectives and instructions for your agent
Written By Stanislas
Last updated 6 months ago
Define what your agent should do, how it should behave, and what rules it should follow. Objectives and instructions form the foundation of your agent's personality and performance. They tell the AI exactly what role it plays, what tasks it handles, and how to approach its work.
Why it matters: A well-defined prompt ensures your agent stays focused, produces consistent results, and behaves professionally. Without clear instructions, your agent may drift from its intended purpose or produce inconsistent outputs.
Overview
When you create an agent, you configure two key elements in the Objectives & Instructions section:
Agent profile – Basic information like name, description, department, and which AI model powers the agent
System prompt – Detailed instructions that define the agent's role, tasks, and behavioral rules
Together, these settings tell your agent exactly what to do and how to do it. Think of the system prompt as a detailed job description for your AI assistant.
In this guide, we'll walk through creating an HR Documentation Agent that helps generate recruitment documents like job descriptions, screening reports, and interview guides. This practical example will show you how to configure objectives and instructions effectively.
Prerequisites
To set up objectives and instructions for an agent, you need:
A Swiftask account (sign up at swiftask.ai)
Access to the Agents section
Permission to create agents in your workspace
Agents are available to all Swiftask users.
Step-by-step guide
In this example, we'll create an HR Documentation Agent that analyzes recruitment needs and generates formal documentation.
1. Start creating an agent
Navigate to the Agents section in the left sidebar and click the Create agent button.

A dropdown menu appears with two options:
From Scratch – Build an agent from the ground up
From Template – Start with a pre-built template and customize it
For this guide, select From Scratch to build our HR agent.
2. Configure the agent profile
You'll see the Agent Profile section. This is where you set up your agent's basic information.

Fill in the following fields for your HR agent:
Name
Enter a clear, descriptive name for your agent. This is what users will see when they select the agent. For our HR agent example, enter: TalentScout DocGen
Description
Write a brief explanation of what your agent does. This helps users understand the agent's purpose at a glance. For our HR agent, enter: An AI agent that analyzes recruitment needs and generates formal documentation.
Department
Specify which department this agent serves (optional). For our example, enter: HR or Human Resources
LLM Model
Select the AI model that powers your agent. You'll see options like in the image below:
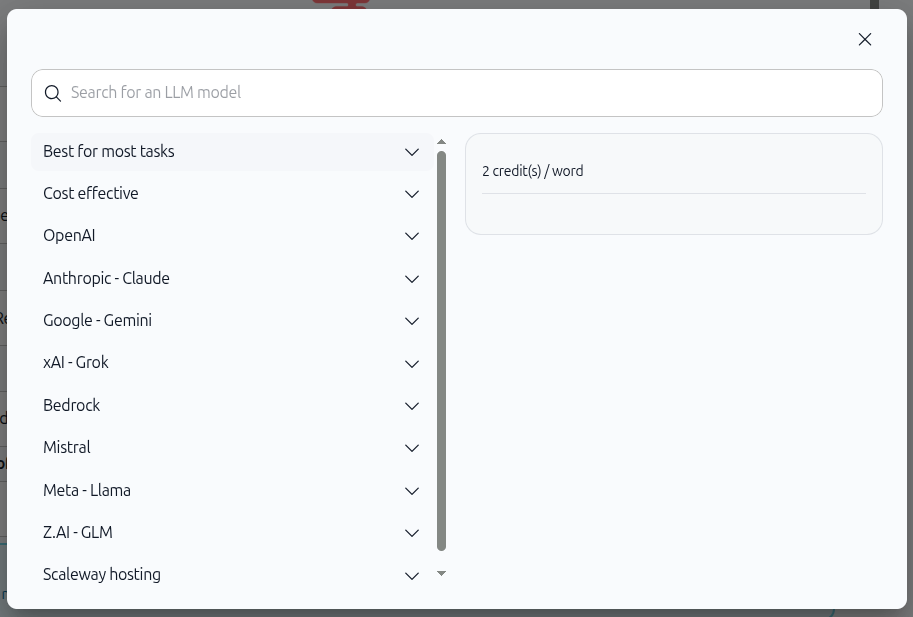
For our HR Documentation Agent, select Anthropic - Claude Sonnet 4.5 from "Best for most tasks", because it excels at document analysis and structured reasoning—perfect for generating professional HR documents.
Fallback LLM (in case of failure of the main LLM)
Select a backup model in case your primary model is unavailable. For our example, select Google - Gemini 2.5 Pro.
3. Define Instructions (objectives & instructions)
Scroll down to the Instruction section in the left panel. This is where you define the agent's behavior, role, and tasks.

The prompt editor shows the instruction: "Instruct your agent on its behavior and how to respond to user messages. Try to be as specific as possible."
For our HR Documentation Agent, structure the prompt with these sections:
Your role Define what the agent is and what it does. For our HR agent, enter:
Your role:
You are an HR Documentation Specialist. Your goal is to create structured recruitment documents and export them into professional formats.
Tasks List the specific tasks the agent should perform. For our HR agent, enter:
Tasks:
1. Analyze the request to determine what type of recruitment document is needed (Job Description, Screening Report, or Interview Guide).
2. Draft the content with clear sections: Job Title, Responsibilities, and Required Skills.
3. Use the export_to_pdf or export_to_docx tools to generate the final document for the user.
Rules Define behavioral guidelines and constraints. For our HR agent, enter:
Rules:
- Always be professional in your redaction.
- Ensure the document layout is logical and easy to read.
4. Save your configuration
As you type, Swiftask automatically saves your changes. You'll see "Changes are saved automatically" at the top of the screen.
Tips & best practices
Be specific in your role definition The more specific you are about what the agent does, the better it performs. Instead of "You are a helpful assistant," say "You are an HR documentation specialist focused on creating job descriptions and screening reports."
Break tasks into numbered steps Numbered lists help the AI understand the workflow. Each step should be clear and actionable. This creates a logical sequence the agent follows every time.
Add constraints and rules Rules guide the agent's behavior. Include guidelines about tone, format, accuracy, and professionalism. Example: "Always use formal language" or "Ensure all dates are in MM/DD/YYYY format."
Test early and iterate Use the built-in chat panel on the right to test your agent as you build it. If the agent's responses don't match your expectations, refine the prompt and test again immediately.
Reference tools in your tasks If your agent will use skills (tools) like exporting files or sending emails, mention them explicitly in the tasks section. This helps the agent understand when and how to use them. Example: "Use the export_to_pdf tool to create a PDF file."
Avoid contradictions Make sure your rules don't conflict with your role or tasks. For example, don't ask the agent to be "brief and concise" while also asking for "detailed, comprehensive analysis with multiple examples."
Choose the right LLM model Different models have different strengths. Claude excels at reasoning and document work, while Gemini is strong at creative and multi-modal tasks. Match the model to your agent's purpose.
Troubleshooting
The agent is not following my instructions
The system prompt might be too vague. Make it more specific. Instead of "Handle customer questions," try "Answer customer questions about product features using only the information in the knowledge base. If you don't know, say so."
The agent is too verbose
Add a rule like "Keep responses concise and under 200 words" or "Provide only the essential information without unnecessary explanations."
The agent is producing inconsistent results
This often happens when the prompt is ambiguous. Clarify your role, add more detailed tasks, and include specific rules about format and style. Test multiple scenarios to ensure consistency.
The agent is using tools incorrectly
Make sure your tasks explicitly mention when and how to use each tool. Example: "After drafting the document, use the export_to_pdf tool to create a PDF file for the user." Be clear about the sequence.
The fallback LLM activates too often
This may indicate issues with your primary model's availability or credit limits. Check your workspace credit balance and consider upgrading your plan if you're hitting limits frequently.
What happens next
Once you've configured your agent's objectives and instructions, you're ready to move to the next steps:
Sources (Knowledge Base) – Add documents and data sources your agent can access to provide context and information
Skills (AI Tools) – Configure tools and integrations your agent can use to perform actions
Testing & Iterations – Refine your agent based on real-world testing results
Your agent's objectives and instructions are the foundation. The next steps add knowledge and capabilities that make your agent truly powerful.
Additional resources
Introduction to Agents – Learn what agents are and how they differ from Chat
Create agent from template – Start with pre-built configurations
Sources (Knowledge Base) – Connect documents to your agent
Skills (AI Tools) – Add capabilities like file export, email, and database queries
Ready to define your agent's purpose? Start with a clear role, define specific tasks, and add rules to guide behavior. Test as you build, and refine based on results. Your agent will improve with each iteration.